高可用系列文章之三 - NGINX 高可用实施方案
本文最后更新于:2025年2月22日 下午
前文链接
四 NGINX 高可用实施方案
高可用的实施,主要步骤概述如下:
- NGINX 的安装及基础配置
- 负载均衡层高可用: NGINX + Keepalived 配置
- 应用服务层高可用: NGINX -> 应用服务层 转发配置
系统软 硬件详细配置清单
根据制造业高可用架构设计,以及业务需求,部署模型建议配置如下:
- 负载均衡服务器 (即 NGINX + Keepalived): 2 台,操作系统 Linux. 配置建议如下:
| 名称 | 规格 | 备注 |
|---|---|---|
| CPU | 2 core | |
| 内存 | 4 GB | |
| 硬盘 | 50 GB | |
| 操作系统 | SUSE12 64 位及补丁 | |
| 网卡 | 至少 1 块网卡,支持 VRRP 技术 |
- 软件运行配置环境:
| 软件 | 规格 | |
|---|---|---|
| NGINX | 1.16.1 | |
| Keepalived | 2.0.10 | |
4.1 NGINX 安装及配置
4.1.1 分区及目录
建议至少分为以下 3 个区:
| 分区及目录 | 大小 | 备注 |
|---|---|---|
主分区 ( /) |
默认 | nginx 程序及配置文件位于该分区 (/etc/nginx) |
日志分区 (/var/log/nginx) |
10G-20G | |
程序目录分区 (/usr/share/nginx/html) |
10G | 可选,nginx 用作 web server 时需要用到此目录. |
4.1.2 程序及依赖版本
| 程序组件 | 安装包名 | 版本 | md5 |
|---|---|---|---|
| nginx | nginx-1.16.1-1.sles12.ngx.x86_64.rpm | 1.16.1 | 396A359F26DD0100CD59545BAFFAFE85 |
4.1.3 NGINX 程序规范
- nginx 程序目录:
/etc/nginx - 执行程序路径:
/usr/sbin/nginx - 主配置文件路径:
/etc/nginx/conf/nginx.conf - 各个应用系统转发配置文件目录:
/etc/nginx/conf.d/ - 日志目录:
/var/log/nginx - 各个应用系统静态文件目录:
/usr/share/nginx/html
4.1.4 系统级别配置优化
❕ 注意:
需要
root用户执行.
- 安装组件:
logrotate - 修改连接数:
1 | |
- 修改系统内核配置:
1 | |
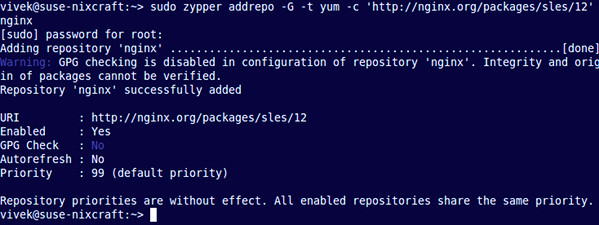
4.1.5 配置 NGINX repo
❕ 注意:
本节命令可以根据具体情况,在公司内部 repo 仓库机器上进行操作.
其他机器只需要配置内部 repo 地址即可.
键入以下 zypper 命令以添加 SLES 的 zypper 存储库
1 | |
接下来,您必须验证数字签名以保持下载包的完整性和来源。使用 wget 命令获取 nginx 签名密钥:
1 | |
示例输出:
1 | |
使用 rpm 命令将密钥导入 rpm:
1 | |
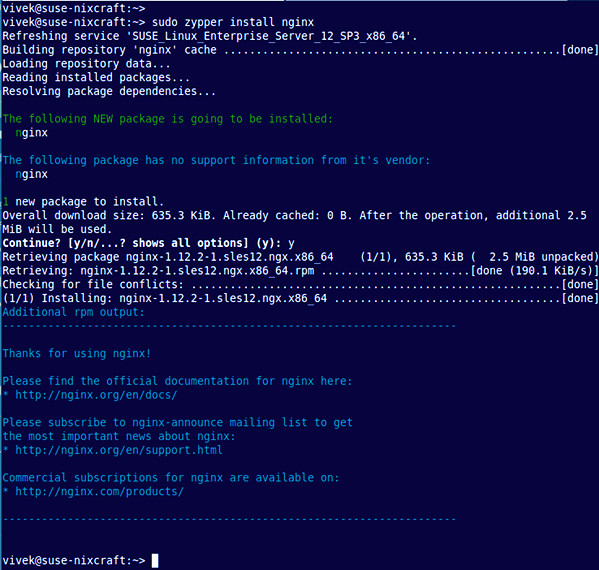
4.1.6 SUSE 上安装 NGINX
键入以下 zypper 命令:
1 | |
4.1.7 可选:配置防火墙
❕ 注意:
如果机房流量入口有其他专用防火墙,则可以关闭 nginx 服务器上的防火墙,且不需要执行此步骤.
首先创建 Nginx 特定服务的配置文件,使用 vi 命令等文本编辑器打开端口 80:
1 | |
添加以下配置:
1 | |
(如果不需要 HTTPS 支持,则只需要允许 TCP 端口号 80 上的通信。) 保存并退出 VI/VIM 文本编辑器。现在,只需运行以下命令打开端口 80:
1 | |
必须使用 TAB 和箭头键在 YaST 中跳转。在 YaST 中,跳转到允许的服务,然后按 Enter 键:
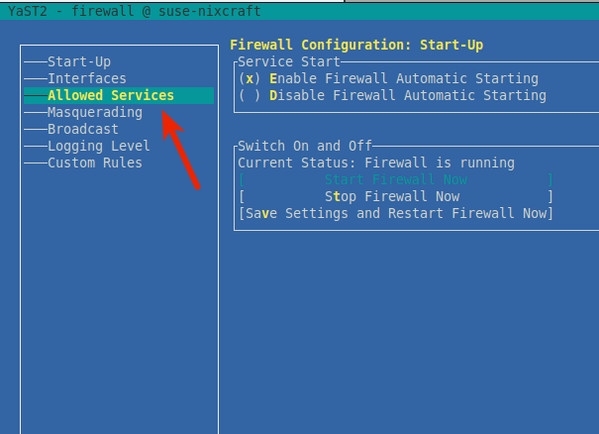
使用 TAB 跳转到 “Allowed Services”,然后按向下箭头键选择 Nginx web server,然后按回车键。必须按 Alt-A 来将 Nginx 服务器添加到防火墙:
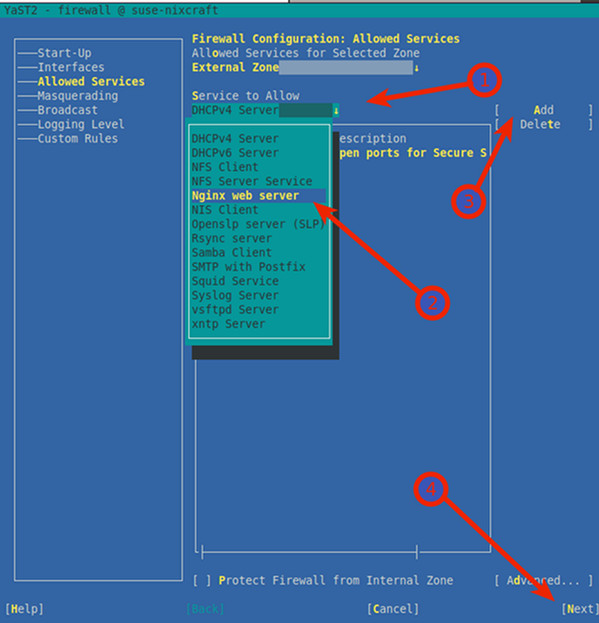
按 Alt-N 和 Alt-F 保存并完成 SLES 上的防火墙设置。返回 shell 提示符后,列出 sle 上的所有 iptables 规则:
1 | |
示例输出:
1 | |
使用 sudo 命令和 grep 命令的组合来确定端口 80 是否打开:
1 | |
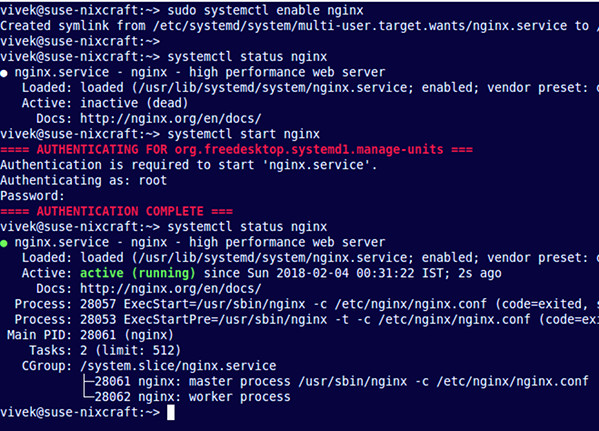
4.1.8 启动 NGINX Server
键入以下 systemctl 命令以在系统启动时启用 Nginx: (开机自启)
1 | |
启动 Nginx web 服务器:
1 | |
验证:
1 | |
要判断 80 端口是否监听,运行以下 netstat 命令或 ss 命令:
1 | |

4.1.9 NGINX 基础操作
停止:
1 | |
启动:
1 | |
重新启动服务:
1 | |
更改配置后重新加载 Ngnix:
1 | |
ℹ 建议:
配置更新后使用
reload来重新加载 nginx.
访问 nginx 页面:
假设 NGINX IP 为: 192.168.0.1. 使用浏览器或 curl 访问:
1 | |
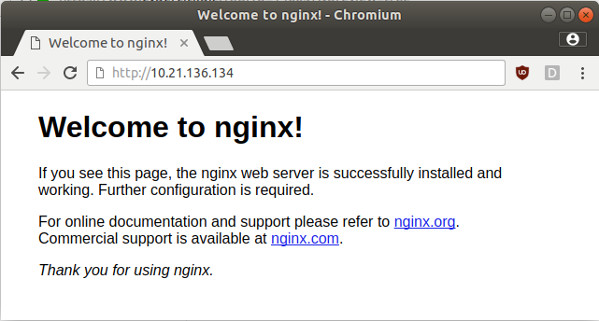
1 | |
示例输出:
1 | |
4.1.10 查找有关 SLES 上 Nginx 配置文件的信息
现在 Nginx 已经启动并运行了。接下来可以定制配置。
SLES 的服务器配置文件:
/etc/nginx/: nginx 默认配置目录/etc/nginx/nginx.conf: nginx 主配置文件/etc/nginx/conf.d/default.conf: 默认 virtual host 的配置
修改主配置:
1 | |
4.1.11 NGINX 日志
/var/log/nginx/access.log: 访问日志/var/log/nginx/error.log: 错误日志
4.1.12 nginx.conf
主配置文件详细说明如下:
1 | |
✔ 建议:
为了保证主配置文件的干净。建议通过
include conf.d/default.conf;类似这样的方式来引入其他 virtual hosts 配置.
4.1.13 日志转储
-
sudo vi /etc/logrotate.d/nginx -
编辑内容:
1
2
3
4
5
6
7
8
9
10
11
12
13
14
15
16
17
18
19
20
21/var/log/nginx/*.log {
daily
rotate 90 # 保留90天, 按需调整
create
dateext
#compress # 是否启用压缩, 按需调整
#minsize 1M
#create 0644 nginx nginx # nginx日志所属用户和组, 按需调整
# copytruncate 用于还在打开中的日志文件,把当前日志备份并截断;是先拷贝再清空的方式,拷贝和清空之间有一个时间差,可能会丢失部分日志数据。
# delaycompress 和compress 一起使用时,转储的日志文件到下一次转储时才压缩
missingok
ifempty # default
nomail
#noolddir # default
sharedscripts # 运行postrotate脚本,作用是在所有日志都轮转后统一执行一次脚本。如果没有配置这个,那么每个日志轮转后都会执行一次脚本
postrotate # 在logrotate转储之后需要执行的指令,例如重新启动 (kill -HUP) 某个服务!必须独立成行
if [ -f /var/log/nginx/nginx.pid ]; then
kill -USR1 `cat /var/log/nginx/nginx.pid`
fi
endscript
} -
强制运行一次来测试:
logrotate -f -v /etc/logrotate.d/nginx(对应目录只能 user 有 w 权限,否则会报错) -
配置好即可,logrotate 会自动读取
/etc/logrotate.d的配置并自动执行.
📓 备注:
cron.daily 会在
3:22+(5,45)这个时间段执行
4.2 NGINX + Keepalived 配置
ℹ 假定:
假设相关 IP 如下:
- VIP: 192.168.0.100
- NGINX - 主 IP: 192.168.0.1
- NGINX - 从 IP: 192.168.0.2
- NGINX - 主从的 IP 对应的网卡为
eth0
4.2.1 Keepalived 安装配置
1 | |
4.2.2 Keepalived 配置
Keepalived 启动默认读取配置文件路径 /etc/keepalived/keepalived.conf , 添加配置文件:
1 | |
NGINX - 主 机器配置如下:
1 | |
配置说明如下:
-
weight -20: keepalived 配置里priority 110是初始权重;主的初始设置了 110,备的设置了 100;如果检测失败,权重 -20. 主从切换. -
virtual_router_id 51自己定义的虚拟路由的 id。vrrp_instance VI_1块中virtual_router_id指令的值 51 是一个示例值;根据需要改变它,使其在您的环境中独一无二。 -
添加
NGINX - 从 机器配置如下:
1 | |
4.2.3 配置检测脚本
❕ 备注:
使用
root用户
配置检测脚本: /etc/keepalived/nginx_pid.sh
1 | |
赋予执行权限: chmod 750 /etc/keepalived/nginx_pid.sh
4.2.4 启动 Keepalived
键入以下 systemctl 命令以在系统启动时启用 keepalived: (开机自启)
1 | |
启动 Nginx web 服务器:
1 | |
验证:
1 | |
4.2.4 显示节点状态
要查看当前哪个节点是给定 VIP 的主节点,请在定义 VRRP 实例的接口上运行命令 ip addr show(在以下命令中,eth0 节点 suse12-1 和上的接口 suse12-2):
1 | |
在此输出中,第二行 inet 表示 suse12-1 是主节点,已为其分配了已定义的 VIP (192.168.0.100)。inet 输出中的其他行显示主节点的实际 IP 地址(192.168.0.1)和备用 (或 从) 节点的 IP 地址(192.168.0.2)。
至此,nginx + keepalived 的负载均衡层高可用已经配置完成.
4.3 NGINX -> 应用服务层 转发配置
ℹ 假定:
假设应用系统的相关信息如下:
- 请求及业务协议为 HTTP 协议;
- 应用系统节点 1 IP 为: 172.30.0.1
- 应用系统节点 2 IP 为: 172.30.0.2
- 业务系统监听端口为: 8080
4.3.1 修改配置文件
以 mes 系统高可用配置为例 (协议为 HTTP 协议), 新增 /etc/nginx/conf.d/mes.conf:
1 | |
4.3.2 主配置文件 include
在 http 块新增如下内容
1 | |
4.3.2 重新加载 nginx
更改配置后重新加载 Ngnix 使配置生效:
sudo systemctl reload nginx
4.3.3 验证
通过 VIP 进行访问,查看对应应用系统日志,观察是否 2 个节点都接收到请求.
五 变更控制流程
❗ 严格遵循 制造业本公司的变更控制规范。进行相关的变更控制和审批流程.
一个新的应用需要上线或者变更,通常涉及以下步骤:
可以随时实施的变更:
- 系统项目组需至少提供端口、路径、后端地址 (域名可选);
- 在
/etc/nginx/conf.d中增加一个配置文件; - 在
/etc/nginx/nginx.conf中增加一个include,指向新增的配置文件;
❗ 需要在变更窗口进行的变更:
- 重新载入 (
sudo systemctl reload nginx) 配置. - 通知用户,访问的 Server IP 由:原应用服务器 IP 调整为 NGINX 的 VIP.
- 修改客户端和浏览器配置,访问的 Server IP 由:原应用服务器 IP 调整为 NGINX 的 VIP.
- 验证变更是否成功.
5.1 回退步骤
回退较为简单,步骤如下:
- 通知用户,访问的 Server IP 调整为:原应用服务器 IP.
- 修改客户端和浏览器配置,访问的 Server IP 调整为:原应用服务器 IP.
- 回退完成
- 验证回退是否成功.
参考文件
| 参考文件 |
|---|
| High Availability Support for NGINX |
