本文最后更新于:2025年2月22日 下午
系列文章
前言
在前文 中我们提到,cilium install 默认安装后,Cilium 功能启用和禁用情况如下:
datapath mode: tunnel: 因为兼容性原因,Cilium 会默认启用 tunnel(基于 vxlan)的 datapatch 模式,也就是 overlay 网络结构。KubeProxyReplacement: Disabled Cilium 是没有完全替换掉 kube-proxy 的,后面我们会出文章介绍如何实现替换。IPv6 BIG TCP: Disabled 该功能要求 Linux Kernel >= 5.19, 所以在 Kernel 4.19.232 状态为禁用。BandwidthManager: Disabled 该功能要求 Linux Kernel >= 5.1, 所以目前是禁用的Host Routing: Legacy Legacy Host Routing 还是会用到 iptables, 性能较弱;但是 BPF-based host routing 需要 Linux Kernel >= 5.10Masquerading: IPtables IP 伪装有几种方式:基于 eBPF 的,和基于 iptables 的。默认使用基于 iptables, 推荐使用 基于 eBPF 的。Hubble Relay: disabled 默认 Hubble 也是禁用的。
今天我们尝试关闭 tunnel 功能,启用本地路由 (Native-Routing) 功能以提升网络性能.
测试环境
Cilium 1.13.4
K3s v1.26.6+k3s1
OS
3 台 Ubuntu 23.04 VM, Kernel 6.2, x86
VXLan 封装
在未提供任何配置的情况下,Cilium 会自动以这种模式运行,因为这种模式对底层网络基础设施的要求最低 。
在这种模式下,所有集群节点都会使用基于 UDP 的封装协议 VXLAN 或 Geneve 形成网状隧道。Cilium 节点之间的所有流量都经过封装.
这种模式的缺点
MTU 开销
由于增加了封装头,有效载荷可用的 MTU 要低于本地路由(VXLAN 每个网络数据包 50 字节)。这导致特定网络连接的最大吞吐率降低。
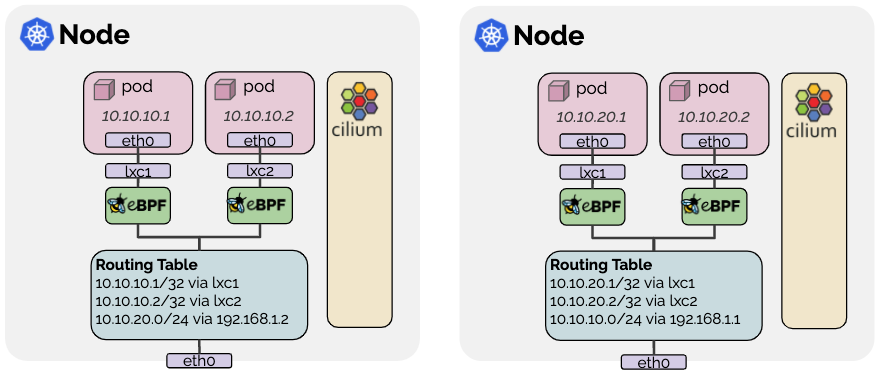
本地路由 (Native-Routing)
本地路由数据路径在 tunnel: disabled 时启用,并启用本机数据包转发模式。本机数据包转发模式利用 Cilium 运行网络的路由功能,而不是执行封装。
在本地路由模式下,Cilium 会将所有未寻址到其他本地端点的数据包委托给 Linux 内核的路由子系统 。这意味着,数据包的路由将如同本地进程发出数据包一样。因此,连接集群节点的网络必须能够路由 PodCIDR。
配置本地路由时,Cilium 会自动在 Linux 内核中启用 IP 转发。
网络需求
要运行本地路由模式,连接运行 Cilium 的主机的网络必须能够转发使用给 pod 或其他工作负载的地址的 IP 流量。
节点上的 Linux 内核必须知道如何转发所有运行 Cilium 的节点上 pod 或其他工作负载的数据包。这可以通过两种方式实现:
节点本身不知道如何路由所有 pod IP,但网络上有路由器知道如何到达所有其他 pod 。在这种情况下,Linux 节点被配置为包含指向此类路由器的默认路由。这种模式用于云提供商网络集成 。有关详细信息,请参阅 Google Cloud 、AWS ENI 和 Azure IPAM 。
每个节点都知道所有其他节点的所有 pod IP,并在 Linux 内核路由表 中插入路由来表示这一点。
如果所有节点共享一个 L2 网络 ,则可以启用选项 auto-direct-node-routes: true 来解决这个问题。本次实验我们使用这种方式启用本地路由.
否则,必须运行额外的系统组件(如 BGP 守护进程)来分发路由。有关如何使用 kube-router 项目实现这一目标,请参阅指南《使用 Kube-Router 运行 BGP》 。
实战:启用本地路由
从现在开始,后续的 cilium 安装配置越来越复杂,有很多定制的配置参数,所以我们从现在开始使用 Helm Chart 方式安装 Cilium.
📚️Reference:
Helm Chart 方法适用于需要对 Cilium 安装进行精细控制的高级安装和生产环境 。它要求你为特定的 Kubernetes 环境手动选择最佳数据路径 (datapath) 和 IPAM 模式。
先使用 Helm Chart 进行最基本安装,保证和前文的配置相同.
卸载 Cilium
首先卸载通过 cilium install 安装的 Cilium.
1
2
export KUBECONFIG=/etc/rancher/k3s/k3s.yaml
Helm Chart 基本安装
然后,使用 Helm Chart 进行基本安装,保证和前文配置相同.
1
2
3
4
5
6
7
8
9
helm repo add cilium https://helm.cilium.io/set operator.replicas=1 \set k8sServiceHost=192.168.2.43 \set k8sServicePort=6443 \set hubble.relay.enabled=true \set hubble.ui.enabled=true
说明如下:
--namespace kube-system 和默认的 cilium install 保持一致,cilium 安装在 kube-system 下operator.replicas=1 指定 Operator 副本数为 1, 默认为 2k8sServiceHost k8sServicePort 显式指定 K8s 集群的 APIServer 的 IP 和 端口hubble.relay.enabled=true hubble.ui.enabled=true 启用 Hubble 可观察性.
重启未受管节点
如果你创建的集群中没有使用 node.cilium.io/agent-not-ready 污点的节点,则需要手动重启未托管的 pod。重启所有已运行但未以主机联网模式运行的 pod,以确保 Cilium 开始管理它们。这样做是为了确保所有在部署 Cilium 之前已经运行的 pod 都具有 Cilium 提供的网络连接,并且 NetworkPolicy 也适用于它们:
1
2
3
4
5
6
7
8
9
10
$ kubectl get pods --all-namespaces -o custom-columns=NAMESPACE:.metadata.namespace,NAME:.metadata.name,HOSTNETWORK:.spec.hostNetwork --no-headers=true | grep '<none>' | awk '{print "-n "$1" "$2}' | xargs -L 1 -r kubectl delete pod"helm-install-traefik-crd-wv67f" deleted"helm-install-traefik-vt2zh" deleted"svclb-traefik-c19bcc42-6jqxs" deleted"coredns-59b4f5bbd5-qmn2k" deleted"local-path-provisioner-76d776f6f9-mpct2" deleted"traefik-57c84cf78d-jpx47" deleted"metrics-server-68cf49699b-dxvnk" deleted"hubble-ui-68fb44f6f5-z9w7c" deleted"hubble-relay-5f68b89b76-s6xp5" deleted
Helm Chart 启用本地路由
1
2
3
4
5
6
helm upgrade cilium cilium/cilium \set tunnel=disabled \set autoDirectNodeRoutes=true \set ipv4NativeRoutingCIDR=10.0.0.0/22
配置说明如下:
--reuse-values 复用上一次的 Helm Chart 安装配置tunnel=disabled 启用本地路由模式autoDirectNodeRoutes=true 每个节点都知道所有其他节点的所有 pod IP,并在 Linux 内核路由表 中插入路由来表示这一点。如果所有节点共享一个 L2 网络 ,则可以启用选项 auto-direct-node-routes: true 来解决这个问题。ipv4-native-routing-cidr: x.x.x.x/y 设置可执行本地路由的 CIDR。
至此,本地路由就已经启用了。可以再次运行相关命令来检查.
验证本地路由是否启用
首先,未启用之前,也就是通过 VXLan 封装时,会有一个对应的 VXLan 网卡 cilium_vxlan. 示例如下:
1
2
3
4
5 : cilium_vxlan: <BROADCAST,MULTICAST,UP,LOWER_UP> mtu 1500 qdisc noqueue state UNKNOWN group default qlen 1000 52 :5 b:dd:37 :f5:45 brd ff:ff:ff:ff:ff:ffinet6 fe80::505 b:ddff:fe37:f545/64 scope link
可以查看 Cilium Agent 的日志:
1
2
3
4
5
6
7
8
$ k3s kubectl logs -f cilium-nxbsn -n kube-system|grep datapath"cilium-agent" out of: cilium-agent, config (init), mount-cgroup (init), apply-sysctl-overwrites (init), mount-bpf-fs (init), clean-cilium-state (init), install-cni-binaries (init)" --datapath-mode='veth'" subsys=daemon"clang (10.0.0) and kernel (6.2.0) versions: OK!" subsys=linux-datapath"linking environment: OK!" subsys=linux-datapath"Restored 1 node IDs from the BPF map" subsys=linux-datapath"Detected devices" devices="[]" subsys=linux-datapath"Setting up BPF datapath" bpfClockSource=jiffies bpfInsnSet=v3 subsys=datapath-loader
通过 --datapath-mode='veth' 可以判断已经成功启用本地路由.
也可以查看网卡的 mtu, cilium 的 vslan 网卡没有了,如下:
1
2
3
4
5
6
7
8
9
10
11
12
13
14
15
16
17
18
19
20
21
22
23
$ ip alink /ether 00:15:5d:02:20:22 brd ff:ff:ff:ff:ff:fflink noprefixroutelink /ether f6:e6:97:fa:8a:d9 brd ff:ff:ff:ff:ff:fflink link /ether 72:f7:bb:f9:31:0b brd ff:ff:ff:ff:ff:fflink link /ether de:89:24:7b:86:e0 brd ff:ff:ff:ff:ff:ff link-netns cni-0253f30e-07bc-2273-640c-7ec96f0a30ddlink
可以看到 cilium 和 lxc 相关的网卡,mtu 已经和 eth0 保持一致,为: mtu 1500. 而在没启用之前,mtu 1280.
没启用本地路由,使用 VXLan 封装的 mtu 如下:
1
2
3
4
5
6
7
8
9
10
11
12
13
14
15
16
17
18
19
20
21
22
23
24
25
$ ip alink /ether aa:94:b7:b4:25:ac brd ff:ff:ff:ff:ff:fflink noprefixroutelink /ether be:0f:af:14:c7:05 brd ff:ff:ff:ff:ff:fflink link /ether 1e:96:a5:af:3c:a3 brd ff:ff:ff:ff:ff:fflink link /ether 1a:41:2c:3b:18:0b brd ff:ff:ff:ff:ff:ff link-netnsid 0link
性能测试
通过 iperf 测试网络吞吐量。来验证启用本地路由带来的性能提升。我们使用 iperf3 来进行测试.
VM 间宽带
测试 VM 间原生带宽,apt 安装 iperf3:
1 sudo apt install -y iperf3
测试 VM 间宽带。结果为:
1
2
3
4
5
6
7
8
9
10
11
12
13
14
15
16
17
18
19
20
$ iperf3 -c 192.168.2.3 -f M 32930 connected to 192.168.2.3 port 5201 1047 MBytes/sec 0 3.12 MBytes 1161 MBytes/sec 0 3.12 MBytes 1150 MBytes/sec 0 3.12 MBytes 1107 MBytes/sec 0 3.12 MBytes 1194 MBytes/sec 0 3.12 MBytes 1120 MBytes/sec 0 3.12 MBytes 1128 MBytes/sec 0 3.12 MBytes 1131 MBytes/sec 0 3.12 MBytes 1211 MBytes/sec 0 3.12 MBytes 1133 MBytes/sec 0 3.12 MBytes 1138 MBytes/sec 0 sender 1138 MBytes/sec receiver
结果为 1138 MBytes/sec 带宽.
容器里部署 iperf3
测试 Cilium vxlan 封装和本地路由模式,将 iperf3 部署为 Daemonset:
1
2
3
4
5
6
7
8
9
10
11
12
13
14
15
16
17
18
19
20
21
apiVersion: apps/v1 kind: DaemonSet metadata: name: iperf3 labels: app: iperf3 spec: selector: matchLabels: app: iperf3 template: metadata: labels: app: iperf3 spec: containers: - name: iperf3 image: clearlinux/iperf:3 command: ['/bin/sh' , '-c' , 'sleep 1d' ]ports: - containerPort: 5201
结果如下:
1
2
3
4
5
$ k3s kubectl get pod -o wide
使用容器内 iperf3 测试
选择一个 pod 作为 server (cilium-62-2 node 上的为 server), 另一个作为 client (cilium-62-3 node 上的为 client).
Server (iperf3-lnwfn) 运行的命令为:
1 kubectl exec -it iperf3-lnwfn -- iperf3 -s -f M
Client (iperf3-g84hd) 运行的命令为:
1 kubectl exec -it iperf3-g84hd -- iperf3 -c 10.0.1.39 -f M
VXLan 封装
VXLan 封装的情况:
1
2
3
4
5
6
7
8
9
10
11
12
13
14
15
16
17
18
19
20
$ kubectl exec -it iperf3-g84hd -- iperf3 -c 10.0.1.39 -f M 38102 connected to 10.0.1.39 port 5201 377 MBytes 377 MBytes/sec 46 1.19 MBytes 458 MBytes 457 MBytes/sec 0 1.31 MBytes 538 MBytes 538 MBytes/sec 46 1.43 MBytes 538 MBytes 537 MBytes/sec 0 1.49 MBytes 525 MBytes 525 MBytes/sec 14 1.50 MBytes 494 MBytes 494 MBytes/sec 0 1.51 MBytes 494 MBytes 494 MBytes/sec 0 1.51 MBytes 494 MBytes 494 MBytes/sec 33 1.52 MBytes 528 MBytes 528 MBytes/sec 0 1.53 MBytes 495 MBytes 495 MBytes/sec 46 1.54 MBytes 494 MBytes/sec 185 sender 493 MBytes/sec receiver
结果为 493 MBytes/sec 左右带宽,直接少了一半.
本地路由
1
2
3
4
5
6
7
8
9
10
11
12
13
14
15
16
17
18
19
20
$ kubectl exec -it iperf3-g84hd -- iperf3 -c 10.0.1.39 -f Mlocal 10.0.2.239 port 39518 connected to 10.0.1.39 port 5201
结果为 1266 MBytes/sec . 和原生的相差无几.
小结
👍️ 禁用封装 (隧道 tunnel)(本次测试为 VXLAN 封装模式), 启用本地路由,确实可以提升网络最大吞吐量.
总结
在未提供任何配置的情况下,Cilium 会自动以封装 (隧道 tunnel) 模式运行,因为这种模式对底层网络基础设施的要求最低 。
在这种模式下,所有集群节点都会使用基于 UDP 的封装协议 VXLAN 或 Geneve 形成网状隧道。
由于增加了封装头,有效载荷可用的 MTU 要低于本地路由,这导致特定网络连接的最大吞吐率降低。
启用本地路由 (Native-Routing) 可以避免这种情况,但是启用对本地网络有一定要求。本次我们通过 autoDirectNodeRoutes=true 方式来进行启用.
通过 iperf 测试,也确实证明启用本地路由可以提升吞吐量.💪
📚️参考文档