Nomad 系列 - Nomad+Traefik+Tailscale 集成实现零信任安全
本文最后更新于:2024年7月25日 下午
系列文章
概述
终于到了令人启动的环节了:Nomad+Traefik+Tailscale 集成实现零信任安全。
在这里:
- Nomad 负责容器调度;(容器编排工具)
- Traefik 负责入口流量;(Ingress 工具)
- Tailscale 实现跨地域联通,4 层加密以及提供 HTTPS 证书。
Traefik 简介
Traefik 是一个现代的 HTTP 反向代理和负载均衡器,使部署微服务变得容易。
Traefik 可以与现有的多种基础设施组件(Docker、Swarm 模式、Kubernetes、Marathon、Consul、Etcd、Rancher、Amazon ECS、Nomad…)集成,并自动和动态地配置自己。
Traefik 与 Nomad Native Service 集成
2023 年 5 月初,Hashicorp 发布了 Nomad 1.3 版本。在此版本之前,当与 Nomad 一起使用服务发现时,Traefik Proxy 用户必须同时使用 Hashicorp Consul 和 Nomad,以便从 Traefik Proxy 著名的自动配置中获益。现在,Nomad 有了一种简单直接的方法来使用内置的服务发现。这大大提高了直接可用性!不仅在简单的测试环境中,而且在边缘环境中。
Traefik 与 Tailscale 集成
从 Traefik Proxy 3.0 Beta 1 发布开始,Traefik Proxy 支持 Tailscale。当 Traefik 收到对 *.ts.net 站点的 HTTPS 请求时,它会从机器的本地 Tailscale 守护进程(实际是 Tailscale 的 socket) 获取 HTTPS 证书。并且证书不需要配置。
Traefik 小结
在这次集成中,我们使用 Traefik 作为 Nomad 集群中工作负载的 HTTP 反向代理和负载均衡,并通过 Nomad Native Service 和 Nomad 集成,通过 Traefik Resolver 与 Tailscale 集成。
Tailscale 简介
Tailscale 是一种 V (irtual) P (rivate) N (etwork) 服务,可以让您在世界任何地方安全、轻松地访问您拥有的设备和应用程序。它使用开源 WireGuard 协议实现加密的点对点连接,这意味着只有您的专用网络上的设备才能相互通信。
Tailscale 快速可靠。与传统的 V (irtual) P (rivate) N (etwork) 不同,传统的通过中央网关服务器隧道传输所有网络流量,Tailscale 则是创建了一个对等 full-mesh 网状网络(称为 tailnet).
Tailscale 提供了一系列的额外实用功能,如:
- MagicDNS: 使用短主机名作为域名直接访问设备。如:
http://raspberry或http://raspberry.west-beta.ts.net - HTTPS 证书: 允许用户为其设备提供 TLS 证书。如上面的:
raspberry.west-beta.ts.net提供授信证书。可以通过https://raspberry.west-beta.ts.net访问且浏览器显示安全的绿锁🔒标志。
默认情况下,Tailscale 节点之间的 (4 层)连接通过端到端加密来保护。然而,浏览器,Web API 和 Visual Studio Code 等产品并不知道这一点,并且可以根据以下事实警告用户或禁用功能:到您的尾网服务的 HTTP URL 看起来未加密,因为它们没有使用 TLS 证书。
而 Tailscale 在启用了:
后,便可以为每台 Tailscale 机器自动或手动生成证书。证书对应的域名如下:

在这次集成中,我们使用 Tailscale 实现跨地域联通,4 层加密以及提供 HTTPS 证书。跨地域联通需要在 Nomad 上进行相关设置;4 层加密为默认提供的;HTTPS 证书则需要分别在 Nomad 以及 Traefik 上进行相关设置。
Nomad+Traefik+Tailscale 集成具体方案
- Tailscale 在多个相同或不同区域 Linux Node 上通过软件源安装;通过 systemd 启动;
- Nomad 安装在这些 Linux Node 上,并指定网卡为 Tailscale 对应网卡 -
tailscale0 - Traefik 以
system类型 job 的方式在 Nomad 上通过 Docker 运行。并与 Tailscale 和 Nomad 集成。
Nomad+Traefik+Tailscale 集成实施步骤
前提
- 多台(最好在不同区域)的 Linux Node(本例中是 Ubuntu Node)
- 这些 Linux Node 最好 Hostname 各不相同
- Nomad 前提:
- Docker 已安装
- Nomad 已安装(版本≥1.3, 越新越好)
- Nomad 集群已创建并运行(至少包括 1 个 Server 和 1 个 Client)
- Tailscale 前提:
- 已创建 Tailscale 账号
- Tailscale 版本大于等于 1.14(越新越好)
- MagicDNS 功能已启用
- HTTPS 证书功能已启用
- Traefik 前提:
- Traefik Proxy 版本 ≥ 3.0 Beta 1
安装并运行 Tailscale
在每台机器上,运行以下命令安装:
1 | |
更多安装方式,请参见:Traefik Nomad Service Discovery Routing - Traefik
这里不做详细介绍。
1 | |
并登录 Tailscale.
Nomad Client 配置调整
Nomad Client 需要进行如下配置调整,以方便后续和 Tailscale 及 Traefik 集成:
- 配置 Tailscale Socket 作为 Nomad Host Volume(供 Docker 中的 Traefik 和 Tailscale 通信)
- 配置网卡为
tailscale0, 使用 Tailscale 网络进行东西向通信。
修改 /etc/nomad.d/nomoad.hcl 的 client 块配置,具体配置如下:
1 | |
具体说明如下:
servers = ["100.99.99.99"]: 指定 servers ip 列表为对应的 Servers 的 Tailscale IP 地址。后续该地址都要根据您的实际情况替换为 Nomad Server 的一个地址或所有地址列表。network_interface = "tailscale0": 指定要强制进行网络指纹识别的接口的名称。在开发模式下运行时,默认为环回接口。不处于开发模式时,将使用连接到默认路由的接口。调度程序在为任务分配端口时从这些指纹 IP 地址中进行选择。这里指定 Nomad 使用 Tailscale 隧道网卡tailscale0作为网络指纹识别的接口。host_volume "tailscale-socket" {: 如 前一篇文章 所述,配置 Nomad Host Volumepath = "/run/tailscale/tailscaled.sock": Tailscale Socket Host Path.read_only = true: 只读。
运行 Traefik Job
Traefik Job HCL - traefik.hcl 具体如下:
1 | |
详细说明如下:
type = "system": 数据中心和节点池中的每个客户端都获得分配。类似于 K8s 的 Daemonset.network {}Network 块,这里指定了 3 个静态端口(类似于 K8s 中的 HostSubnet), 即容器内和主机都监听:http端口80https端口443adminTraefik admin 端口8080(因为底层是 Tailscale, 所以其实 HTTP 也是在 4 层透明加密过的)
service {}2 个 Service 块,都是 Nomad Native Service. 分别是:traefik-http服务:指向http端口 -80traefik-https服务:指向https端口 -443
volume "tailscale-socket" {通过 Nomad Host Volume 声明 Tailscale Sockettype = "host": Volume 类型为 Nomad Host Volumeread_only = true: Volume 级别 read_only 配置source: source 指向 Nomad Client 的tailscale-socket, 即:/run/tailscale/tailscaled.sockpath
driver = "docker": Traefik 实际在 Docker 中运行volume_mount {: volume mount 配置:destination = "/var/run/tailscale/tailscaled.sock": 将 Tailscale Socket 挂载到容器内/var/run/tailscale/tailscaled.sockpath.
config {docker 配置块。image = "traefik:v3.0": 指定 traefik 镜像为:traefik:v3.0ports = ["admin", "http", "https"]: 对外暴露的端口为:80, 443, 8080args [: traefik 启动参数"--api.dashboard=true": 启动 Traefik Dashboard"--api.insecure=true": 仅供测试使用,请勿在生产环境中使用"--entrypoints.web.address=:${NOMAD_PORT_http}": 指定 Traefik 的 web 端口为:NOMAD_PORT_http环境变量,即:80. 地址为::80(监听全部地址)"--entryPoints.websecure.address=:${NOMAD_PORT_https}": 指定 Traefik 的 websecure 地址为::443"--entrypoints.traefik.address=:${NOMAD_PORT_admin}": 指定 Traefik 的 traefik 地址为::8080"--providers.nomad=true": 启用 Traefik 与 Nomad 集成"--providers.nomad.endpoint.address=http://100.99.99.99:4646": 指定 Nomad Server 地址"--certificatesresolvers.tailscaleresolver.tailscale=true": 启用 Traefik 与 Tailscale 集成。创建一个 Traefik Resolver 名为:tailscaleresolver, 且和 Tailscale 集成。
运行该 Job:
1 | |
则 Traefik 会部署到 Nomad 所有的 Client 上。
至此,我们完成了 Nomad+Traefik+Tailscale 的集成。🎉🎉🎉
验证 Nomad+Traefik+Tailscale 效果
通过 Traefik Dashboard 验证
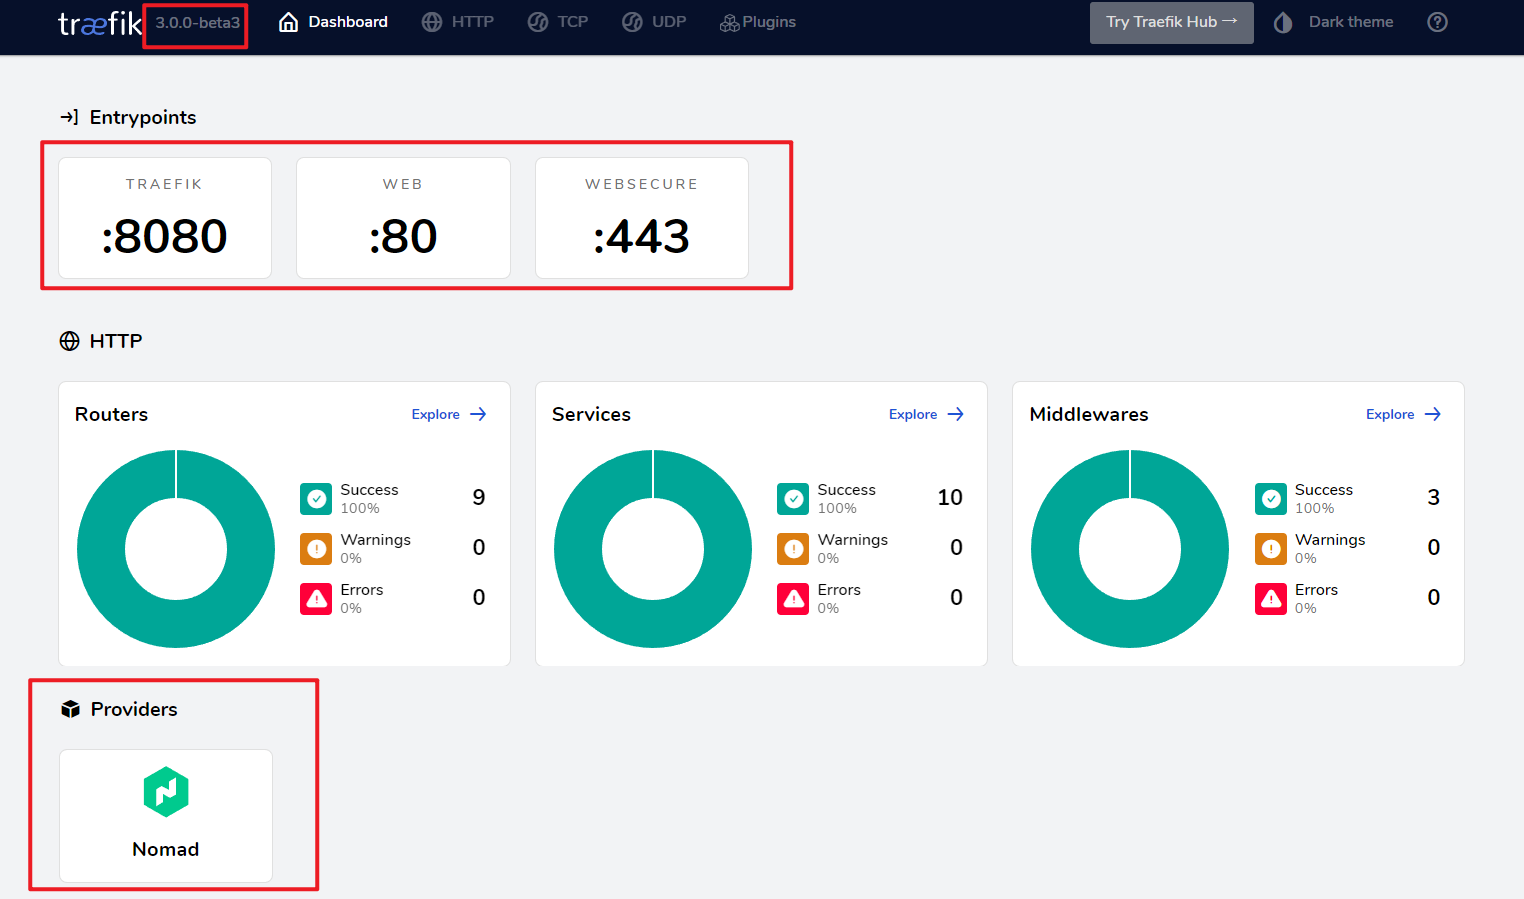
首先,打开 Traefik Dashboard - http://100.99.99.99, 效果如下:

从上图可以看到:
- Traefik 的版本是 3.0 Beta 1 以上,实际为:
3.0.0-beta3 - Traefik 监听的端口为:80, 443 和 8080
- Traefik 已经和
Nomad集成,Providers 显示为 Nomad.
创建 Nomad Service 验证
我们基于 HashiCorp Nomad 官方提供的另一个 Demo 程序:HashiCups 来进行配置调整:
1 | |
修改 hashicups.hcl 的以下内容:(内容有省略)
1 | |
具体说明如下:
to = var.nginx_port: 🐾注意,这里要从static改为to, 避免 Host 端口冲突。Host 端口会随机分配一个端口。service {: service 块,这里provider = "nomad", Traefik 会通过 Nomad Server API 获取 Nomad Native Service, 并通过tags获取具体路由配置。
1 | |
这里是 Traefik 的配置风格,Traefik 和 Nomad 集成时,Nomad tags 的配置和 Traefik docker 集成的配置风格是一模一样的。
traefik.http.routers.hashicups.rule=Host(...)创建hashicupsrouter. 并指定域名,这里我指定了我的一台 Nomad Client Node 的 Tailscale 完整域名:firefly-sub03.west-beta.ts.net. 其中.west-beta.ts.net是我的专属域,如果您要配置,请根据从 Tailscale Admin Console 获取到的域自行调整。firefly-sub03是我的一台 Linux Node 的 hostname, 显然,这台 Node 上安装了:nomad client, tailscale, traefik."traefik.http.routers.hashicups.tls.certResolver=tailscaleresolver"指定该 router 的 HTTP 证书解析方名称为:tailscaleresolver, 即 tailscale.
效果如下:
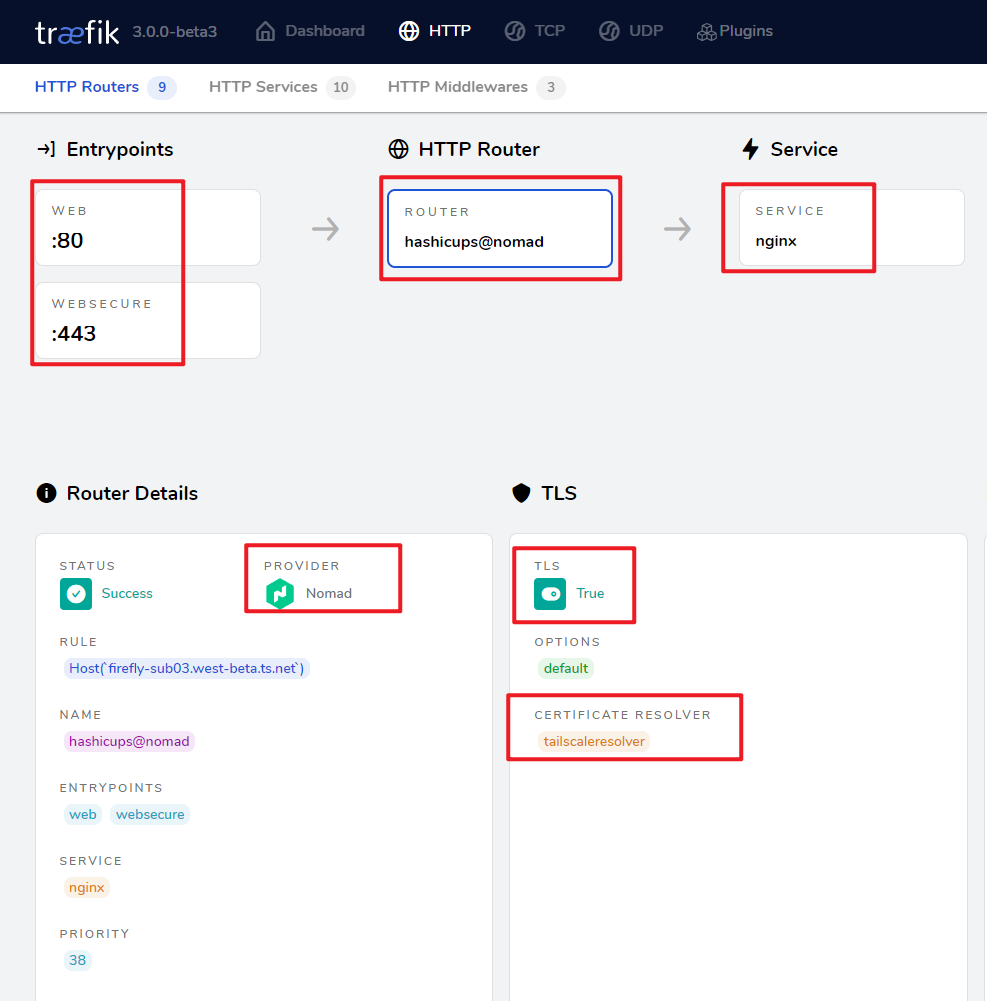
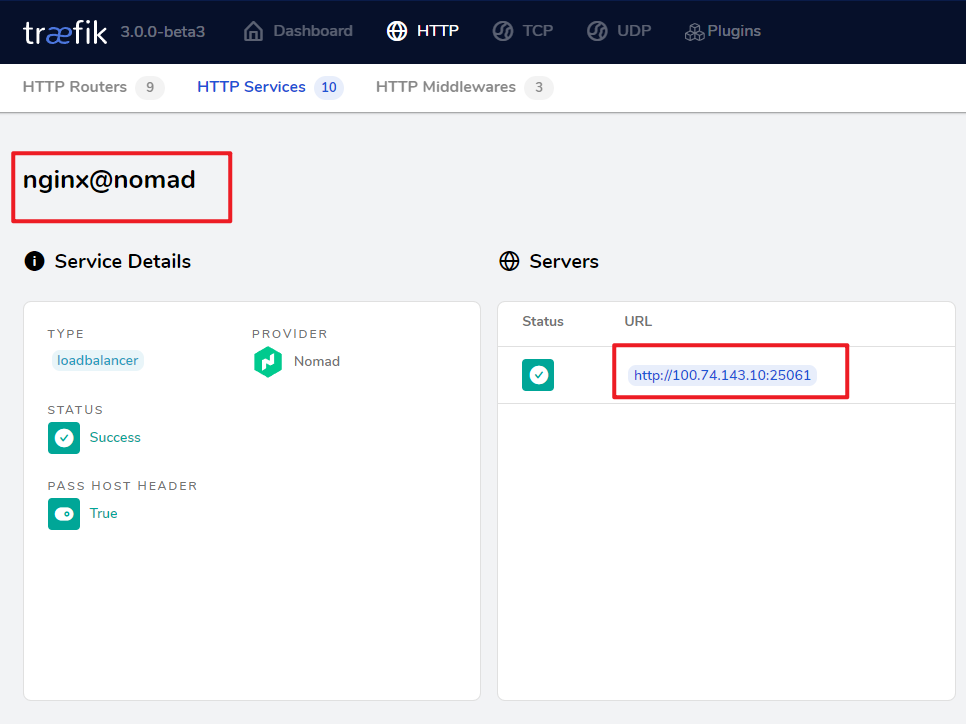
在 Traefik Dashboard 上展示如下:

△ 可以看到,通过 http://firefly-sub03.west-beta.ts.net/ 或 https://firefly-sub03.west-beta.ts.net/ 都可以访问到 Nomad 的 nginx service. 并且 TLS 启用,且 Resolver 是 tailscaleresolver

△ 可以看到,Nomad 为 nginx service 自动分配的地址是:http://100.74.143.10:25061 端口是一个随机端口 (我这里 Nomad 网络使用 host 模式,而不是 bridge 模式)
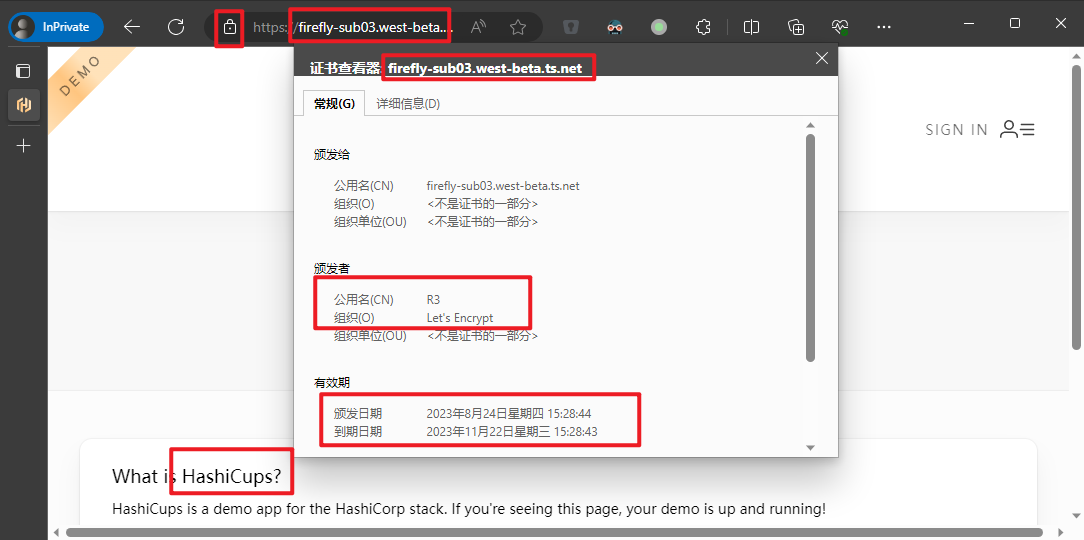
直接通过 TS 内网访问 https://firefly-sub03.west-beta.ts.net/ 如下:

△可以看到,通过域名可以访问到 Hashicups, 并且该域名的 HTTPS 证书也是受信的。
🎉🎉🎉
总结
本文我们通过 Nomad+Traefik+Tailscale 集成实现零信任安全。
在这里:
- Nomad 负责容器调度;(容器编排工具)
- Traefik 负责入口流量;(Ingress 工具)
- Tailscale 实现跨地域联通,4 层加密以及提供 HTTPS 证书。
具体来说,在这次集成中:
- 使用 Traefik 作为 Nomad 集群中工作负载的 HTTP 反向代理和负载均衡,并通过 Nomad Native Service 和 Nomad 集成,通过 Traefik Resolver 与 Tailscale 集成。
- 使用 Tailscale 实现跨地域联通,4 层加密以及提供 HTTPS 证书。
- 跨地域联通需要在 Nomad 上进行相关设置;
- 4 层加密为默认提供的;
- HTTPS 证书则需要分别在 Nomad 以及 Traefik 上进行相关设置。
并且,这套方案也特别适合边缘 Edge 环境:
- Nomad 为边缘集群提供了简单轻量的(容器)编排服务
- Traefik 为边缘集群提供了 4 层 和 7 层的 负载均衡以及 7 层的 HTTP 代理服务
- Tailscale 为边缘集群的 "云" “边” “端” 提供了隧道打通,实现网络连接和边缘网络加密。并自动为 HTTPS 提供受信证书。
📚️参考文档
- Traefik Proxy Integrates with Hashicorp Nomad | Traefik Labs
- Traefik Nomad Service Discovery Routing - Traefik
- Load Balancing with Traefik | Nomad | HashiCorp Developer
- Traefik Proxy Integrates with Hashicorp Nomad | Traefik Labs
- Traefik Tailscale Documentation - Traefik
- Download · Tailscale
- Integrations · Tailscale
- Traefik certificates on Tailscale · Tailscale
- Deploy an App with Nomad Service Discovery | Nomad | HashiCorp Developer
