本文最后更新于:2025年2月22日 下午
系列文章前情提要:
WireGuard 系列文章(一):什么是 VPN WireGuard 系列文章(二):WireGuard 简介 - 快速、现代、安全的 VPN 隧道 WireGuard 系列文章(三):WireGuard 安装 WireGuard 系列文章(四):WireGuard 快速上手 WireGuard 系列文章(五):Netmaker 简介 - 创建和管理 WireGuard 网络的平台 WireGuard 系列文章(六):Netmaker 安装 WireGuard 系列文章(七):使用 WireGuard 和 Netmaker 创建 Full Mesh 网络 WireGuard 系列文章(八):基于 WireGuard 的 K8S CNI Kilo 简介
🛠️ 实战环节!基于 K3S + WireGuard + Kilo 搭建跨多云的统一 K8S 集群。💪💪💪
步骤
1. 前提
1.1 跨云的多台云主机
准备至少 2 台不同公有云的云主机(配置最低 1C1G 就能跑得动),这里准备了 6 台,主机名要求各不相同,分别是:
天翼云:ty1(K3S Server)
阿里云:ali(K3S Agent)
华为云:hw1(K3S Agent)
百度云:bd1 和 bd2(K3S Agent)
腾讯云:tx1(K3S Agent)
1.2 操作系统
操作系统:推荐 ubuntu 20.04(截止 2022/1/22),因为可以安装 WireGuard 方便。
1.3 已安装 WireGuard
且已安装 WireGuard,安装过程见👉️这里
1.4 网络
协议
端口
源
描述
TCP
6443
K3s agent 节点
Kubernetes API Server
UDP
51820
K3s server 和 agent 节点
Kilo 网络间通信
TCP
10250
K3s server 和 agent 节点
Kubelet metrics
TCP
2379-2380
K3s server 节点
只有嵌入式 etcd 高可用才需要
通常情况下,所有出站流量都是允许的。
1.5 确保云主机有公网 IP
每个 location 至少有一个节点的 IP 地址与其他位置路由可达。
如果 location 在不同的云或私有网络中,那么这必须是一个公共 IP 地址。如果该 IP 地址没有在节点的以太网设备上自动配置,可以使用 kilo.squat.ai/force-endpoint 注释方式手动指定。
1.6 云主机启用 IPv4 Forwarding
在 /etc/sysctl.conf 有这么一行:
并生效:systel -p
1.7 (可选)配置镜像仓库配置
参考这里👉️:私有镜像仓库配置参考
2. 安装 K3S Server
备注 :
K3S Server 可以简单的类比为 K8S 的 master。
2.1 一键安装 K3S Server
细节省略,直接通过 cnrancher 的安装脚本来一键安装:
1 curl -sfL http://rancher-mirror.cnrancher.com/k3s/k3s-install.sh | INSTALL_K3S_MIRROR=cn K3S_CLUSTER_INIT=true INSTALL_K3S_EXEC="--tls-san {{ server_public_ip }} --node-external-ip {{ master_ip }} --flannel-backend none --kube-proxy-arg metrics-bind-address=0.0.0.0 --kube-apiserver-arg feature-gates=EphemeralContainers=true" sh -s -
简要说明:
K3S_CLUSTER_INIT=true: 集群模式,会安装内置的 etcd,而不是 sqlite3;--tls-san {{ server_public_ip }}: {{ server_public_ip }} 改为你自己指定的 k3s server 公网 IP,--tls-san 这个选项在 TLS 证书中增加了一个额外的主机名或 IP 作为备用名称,如果你想通过 IP 和主机名访问,可以多次指定。--node-external-ip {{ server_public_ip }}:指定 node 的公网 IP--flannel-backend none:K3S 默认网络插件为 flannel,这里意思是不使用 flannel,后面单独安装 Kilo。--kube-proxy-arg metrics-bind-address=0.0.0.0: kube-proxy 参数。(可选):--kube-apiserver-arg feature-gates=EphemeralContainers=true 启用 feature-gates:EphemeralContainers,方便在不重启 pod 的情况下附加 sidecar 进行调试。
❌ 错误 :
如果不指定 --tls-san ,可能会导致 kubectl 无法通过 server_public_ip 来访问集群。 如果不指定 --node-external-ip ,可能会导致位于其他云的 k3s agent 无法连接到 K3S Server 的 API。 如果不指定 --kube-proxy-arg metrics-bind-address=0.0.0.0,可能导致无法获取到 Metrics。
2.2 查看安装结果
具体如下:
1
2
3
4
5
6
7
8
9
10
11
12
13
14
15
16
17
18
19
❯ systemctl status k3s.service
1
2
3
4
5
6
7
8
9
10
11
12
13
❯ journalctl -f -b -u k3s.service
1
2
3
4
❯ k3s kubectl cluster-info
1
2
3
❯ k3s kubectl get node
⚠️ 注意 :
此时 K3S Server 的状态是 NotReady,这是正常状况,因为还没有安装 CNI 网络插件。
3. 安装 Kilo
3.1 指定 K3S Server 拓扑
我的 K3S Server 在天翼云上,指定拓扑:
1
2
3
k3s kubectl annotate node ty1.k3s kilo.squat.ai/location="ctyun"
解释在这里👉️:Kilo Annotions - location
3.2 安装 Kilo❗️
通过在集群中部署一个 DaemonSet 来安装 Kilo。
1
2
kubectl apply -f https://gitee.com/mirrors/squat/raw/main/manifests/crds.yaml
ℹ️ 备注 :
上面的地址是 Kilo 的 Gitee mirror 仓库。
详细说明:
crds.yaml 安装了 peer.kilo.squat.ai,用于通过该 CRD 配置 WireGuard Peer。kilo-k3s.yaml 安装了 Kilo CNI,包括:
ConfigMap
cni-conf.jsonkilo-scripts
ServiceAccount
ClusterRole
ClusterRoleBinding
DaemonSet: 运行在所有 Node 上
其中,WireGuard 的配置:
ini 格式的 WireGuard 配置位于:/var/lib/kilo/conf
WireGuard 的 key 位于:/var/lib/kilo/key
3.3 验证
kube-system ns 中,已创建 kilo DaemonSet,且所有 Pod 已出于 Running 状态 K3S Server Node 状态从 NotReady 变为 Ready
K3S Server Node 上,已经有 kilo 的相关 annotations, 示例如下:
1
2
3
4
5
6
7
8
9
10
11
12
13
14
15
16
17
18
19
20
21
22
23
apiVersion: v1 kind: Node metadata: name: ty1.k3s labels: beta.kubernetes.io/arch: amd64 ... annotations: k3s.io/external-ip: x.x.x.x k3s.io/hostname: ty1.k3s k3s.io/internal-ip: 192.168 .1 .226 k3s.io/node-args: >- ["server","--tls-san","x.x.x.x","--node-external-ip","x.x.x.x","--flannel-backend","none","--kube-proxy-arg","metrics-bind-address=0.0.0.0","--kube-apiserver-arg","feature-gates=EphemeralContainers=true"] kilo.squat.ai/endpoint: x.x.x.x:51820 kilo.squat.ai/force-endpoint: x.x.x.x:51820 kilo.squat.ai/granularity: location kilo.squat.ai/internal-ip: 192.168 .1 .226 /24 kilo.squat.ai/key: zCiXXXXXXXXXXXXXXXXXXXXXXXXXXXXQTL9CEc= kilo.squat.ai/last-seen: '1642856638' kilo.squat.ai/location: ctyun kilo.squat.ai/persistent-keepalive: '20' kilo.squat.ai/wireguard-ip: 10.4 .0 .3 /16 ...
4. 安装 K3S Agent
4.1 一键安装 K3S Agent
1 curl -sfL http://rancher-mirror.cnrancher.com/k3s/k3s-install.sh | INSTALL_K3S_MIRROR=cn K3S_TOKEN={{ token }} K3S_URL=https://{{ server_public_ip }}:6443 sh -s - --node-external-ip {{ node_public_ip }} --kube-proxy-arg "metrics-bind-address=0.0.0.0"
4.2 等待 K3S Agent 加入集群中
等待 K3S Agent 加入集群中,状态 NotReady 没关系:
1
2
3
4
5
6
7
8
9
10
11
12
13
14
15
16
17
18
19
20
21
22
23
24
25
26
27
28
29
30
31
32
33
34
35
36
37
38
39
40
41
42
43
44
45
46
47
48
49
50
51
52
53
54
55
56
57
58
59
60
❯ systemctl status k3s-agent.servicetime ="2022-01-22T16:27:35+08:00" level=info msg="Starting k3s agent v1.22.5+k3s1 (405bf79d)" time ="2022-01-22T16:27:35+08:00" level=info msg="Running load balancer 127.0.0.1:6444 -> [192.168.1.226:6443 140.246.255.203:6443]" time ="2022-01-22T16:27:55+08:00" level=error msg="failed to get CA certs: Get \"https://127.0.0.1:6444/cacerts\": context deadline exceeded (Client.Timeout exceeded while awaiting headers)" time ="2022-01-22T16:28:01+08:00" level=info msg="Module overlay was already loaded" time ="2022-01-22T16:28:01+08:00" level=info msg="Module nf_conntrack was already loaded" time ="2022-01-22T16:28:01+08:00" level=info msg="Module br_netfilter was already loaded" time ="2022-01-22T16:28:01+08:00" level=info msg="Module iptable_nat was already loaded" time ="2022-01-22T16:28:01+08:00" level=info msg="Using private registry config file at /etc/rancher/k3s/registries.yaml" time ="2022-01-22T16:28:01+08:00" level=info msg="Logging containerd to /var/lib/rancher/k3s/agent/containerd/containerd.log" time ="2022-01-22T16:28:01+08:00" level=info msg="Running containerd -c /var/lib/rancher/k3s/agent/etc/containerd/config.toml -a /run/k3s/containerd/containerd.sock --state /run/k3s/containerd --root /var/lib/rancher/k3s/agent/containerd" time ="2022-01-22T16:28:02+08:00" level=info msg="Containerd is now running" time ="2022-01-22T16:28:02+08:00" level=info msg="Updating load balancer server addresses -> [140.246.255.203:6443]" time ="2022-01-22T16:28:02+08:00" level=info msg="Connecting to proxy" url="wss://140.246.255.203:6443/v1-k3s/connect" time ="2022-01-22T16:28:02+08:00" level=info msg="Running kubelet --address=0.0.0.0 --anonymous-auth=false --authentication-token-webhook=true --authorization-mode=Webhook --cgroup-driver=cgroupfs --client-ca-file=/var/lib/rancher/k3s/agent/cli> Jan 22 16:28:02 ali1.k3s k3s[4081]: Flag --cloud-provider has been deprecated, will be removed in 1.23, in favor of removing cloud provider code from Kubelet. Jan 22 16:28:02 ali1.k3s k3s[4081]: Flag --containerd has been deprecated, This is a cadvisor flag that was mistakenly registered with the Kubelet. Due to legacy concerns, it will follow the standard CLI deprecation timeline before being removed. Jan 22 16:28:02 ali1.k3s k3s[4081]: I0122 16:28:02.742554 4081 server.go:436] " Kubelet version" kubeletVersion=" v1.22.5+k3s1" Jan 22 16:28:02 ali1.k3s k3s[4081]: I0122 16:28:02.798379 4081 dynamic_cafile_content.go:155] " Starting controller" name=" client-ca-bundle::/var/lib/rancher/k3s/agent/client-ca.crt" Jan 22 16:28:02 ali1.k3s k3s[4081]: I0122 16:28:02.891854 4081 server.go:687] " --cgroups-per-qos enabled, but --cgroup-root was not specified. defaulting to /" Jan 22 16:28:02 ali1.k3s k3s[4081]: I0122 16:28:02.892197 4081 container_manager_linux.go:280] " Container manager verified user specified cgroup-root exists" cgroupRoot=[] Jan 22 16:28:02 ali1.k3s k3s[4081]: I0122 16:28:02.892310 4081 container_manager_linux.go:285] " Creating Container Manager object based on Node Config" nodeConfig={RuntimeCgroupsName: SystemCgroupsName: KubeletCgroupsName: ContainerRuntime:remote CgroupsPerQOS:true CgroupRoot> Jan 22 16:28:02 ali1.k3s k3s[4081]: I0122 16:28:02.892345 4081 topology_manager.go:133] " Creating topology manager with policy per scope" topologyPolicyName=" none" topologyScopeName=" container" Jan 22 16:28:02 ali1.k3s k3s[4081]: I0122 16:28:02.892357 4081 container_manager_linux.go:320] " Creating device plugin manager" devicePluginEnabled=true Jan 22 16:28:02 ali1.k3s k3s[4081]: I0122 16:28:02.892403 4081 state_mem.go:36] " Initialized new in-memory state store" Jan 22 16:28:02 ali1.k3s k3s[4081]: I0122 16:28:02.893507 4081 kubelet.go:418] " Attempting to sync node with API server" Jan 22 16:28:02 ali1.k3s k3s[4081]: I0122 16:28:02.893533 4081 kubelet.go:279] " Adding static pod path" path=" /var/lib/rancher/k3s/agent/pod-manifests" Jan 22 16:28:02 ali1.k3s k3s[4081]: I0122 16:28:02.893577 4081 kubelet.go:290] " Adding apiserver pod source " Jan 22 16:28:02 ali1.k3s k3s[4081]: I0122 16:28:02.893601 4081 apiserver.go:42] " Waiting for node sync before watching apiserver pods" Jan 22 16:28:02 ali1.k3s k3s[4081]: I0122 16:28:02.897574 4081 kuberuntime_manager.go:245] " Container runtime initialized" containerRuntime=" containerd" version=" v1.5.8-k3s1" apiVersion=" v1alpha2" Jan 22 16:28:02 ali1.k3s k3s[4081]: I0122 16:28:02.898404 4081 server.go:1213] " Started kubelet" Jan 22 16:28:02 ali1.k3s k3s[4081]: I0122 16:28:02.901202 4081 fs_resource_analyzer.go:67] " Starting FS ResourceAnalyzer" Jan 22 16:28:02 ali1.k3s k3s[4081]: I0122 16:28:02.903670 4081 server.go:149] " Starting to listen" address=" 0.0.0.0" port=10250 Jan 22 16:28:02 ali1.k3s k3s[4081]: I0122 16:28:02.904727 4081 server.go:409] " Adding debug handlers to kubelet server" Jan 22 16:28:02 ali1.k3s k3s[4081]: I0122 16:28:02.909003 4081 volume_manager.go:291] " Starting Kubelet Volume Manager" Jan 22 16:28:02 ali1.k3s k3s[4081]: I0122 16:28:02.909628 4081 desired_state_of_world_populator.go:146] " Desired state populator starts to run" Jan 22 16:28:02 ali1.k3s k3s[4081]: I0122 16:28:02.949667 4081 kubelet_network_linux.go:56] " Initialized protocol iptables rules." protocol=IPv4 Jan 22 16:28:02 ali1.k3s k3s[4081]: I0122 16:28:02.971847 4081 kubelet_network_linux.go:56] " Initialized protocol iptables rules." protocol=IPv6 Jan 22 16:28:02 ali1.k3s k3s[4081]: I0122 16:28:02.972256 4081 status_manager.go:158] " Starting to sync pod status with apiserver" Jan 22 16:28:02 ali1.k3s k3s[4081]: I0122 16:28:02.972423 4081 kubelet.go:1967] " Starting kubelet main sync loop" ... Jan 22 16:28:03 ali1.k3s k3s[4081]: I0122 16:28:03.331465 4081 kubelet_node_status.go:74] " Successfully registered node" node=" ali1.k3s"
1
2
3
4
5
6
7
8
❯ k3s kubectl get node
4.3 指定 K3S Agent 拓扑
1 2 3 4 5 6 7 8 9 10 11 12 13 14 15 16 17 18 19 20 21 22 23 24 "aliyun" "huaweicloud" "baidu" "baidu" "tencentcloud"
等待所有的节点状态 Ready.
5. 验证
5.1 验证网络通断
部署 1 个 busybox 的 DaemonSet,使其落在每一个 Node 上。验证网络流向:
进入其中一个 pod,ping 其他 pod,可以互相 ping 通,示例如下:
1
2
3
4
5
6
7
8
9
10
11
12
13
14
15
16
17
18
19
20
21
/ seq =0 ttl=62 time =6.604 msseq =1 ttl=62 time =6.520 msseq =2 ttl=62 time =6.412 msseq =3 ttl=62 time =6.430 msseq =4 ttl=62 time =6.487 msseq =0 ttl=62 time =7.426 msseq =1 ttl=62 time =7.123 msseq =2 ttl=62 time =7.109 msseq =3 ttl=62 time =7.129 ms
ping 其他 node 的 WireGuard 地址,也可以 ping 通,如下:
1
2
3
4
5
6
7
8
9
10
11
12
13
14
15
16
/ seq =0 ttl=64 time =0.077 msseq =1 ttl=64 time =0.099 msseq =0 ttl=63 time =29.000 msseq =1 ttl=63 time =28.939 ms
ping 其他 node 的默认内网地址,也可以 ping 通,如下:
1
2
3
4
5
6
7
8
9
10
11
12
13
14
15
16
/ seq =0 ttl=63 time =6.327 msseq =1 ttl=63 time =6.350 msseq =0 ttl=63 time =29.261 msseq =1 ttl=63 time =29.015 ms
证明网络(pod-pod,pod-node)全通。
5.2 ℹ️ 详细说明
5.2.1 网卡
Kilo 建立了 3 个网卡,分别为:
kilo0:WireGuard VPN 网络,用以 Node 间组建 VPN 内网;(bd2 上没有该网卡,因为和 bd1 同属一个 VPC 内网,内网内连接默认不通过 WireGuard 加密,只有出 VPC 内网才会走 WireGuard 加密)kube-bridge: 桥接网络,使得 Pod 的网卡与云主机的网卡进行连接,以此实现 Pod 通过 WireGuard VPN 网络共享通信;
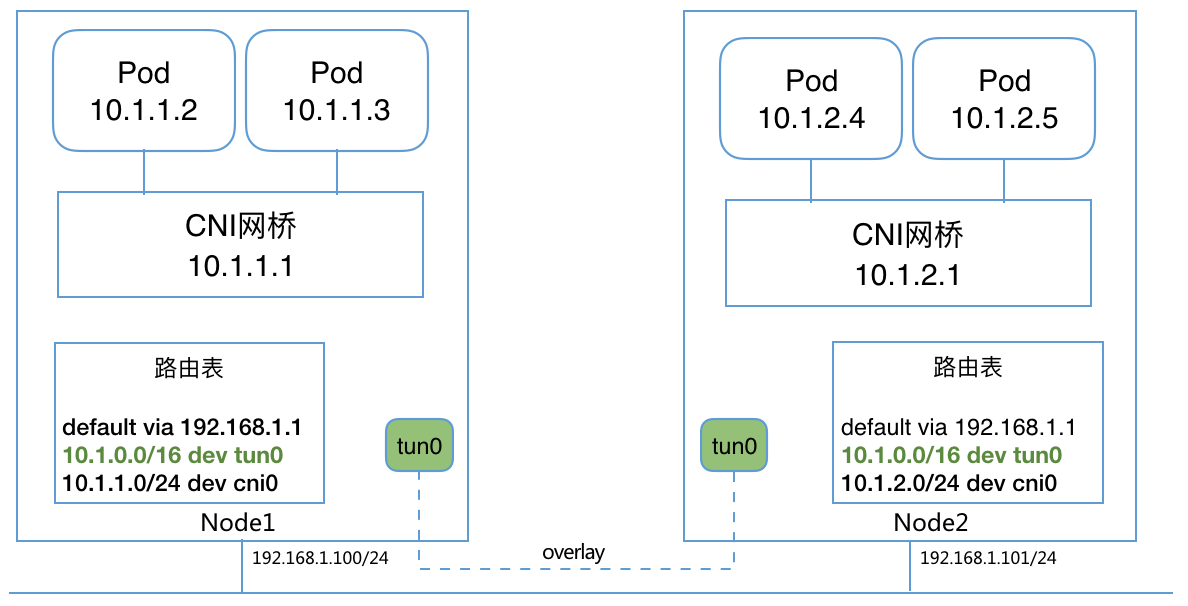
tunl0:Bridge 模式下,多主机网络通信需要额外配置主机路由,或使用 overlay 网络。通过 Kilo 来自动配置。比如 overlay 情况下的网络结构为:
其中,kube-bridge 配置如下:
1
2
3
4
5
6
7
8
9
10
11
12
13
14
15
16
17
18
19
20
21
22
23
24
{ "cniVersion" : "0.3.1" , "name" : "kilo" , "plugins" : [ { "name" : "kubernetes" , "type" : "bridge" , "bridge" : "kube-bridge" , "isDefaultGateway" : true , "forceAddress" : true , "mtu" : 1420 , "ipam" : { "type" : "host-local" } } , { "type" : "portmap" , "snat" : true , "capabilities" : { "portMappings" : true } } ] }
5.2.2 CIDR
如下:
云主机
自带内网 IP
WireGuard VPN IP
Pod CIDR
ty1
192.168.1.226
10.4.0.3/16
10.42.0.0/24
ali1
172.21.143.136
10.4.0.1/16
10.42.3.0/24
hw1
192.168.7.226
10.4.0.4/16
10.42.1.0/24
bd1
192.168.64.4
10.4.0.2/16
10.42.4.0/24
bd2
192.168.64.5
无
10.42.5.0/24
tx1
172.17.0.3
10.4.0.5/16
10.42.2.0/24
ℹ️ 备注 :
云主机的自带内网 IP 没有经过任何特殊设置,都是公有云自动生成的。
5.2.3 路由表
再看路由表,以 ty1 为例,如下:
1
2
3
4
5
6
7
8
9
10
11
12
13
14
15
16
❯ route -n
bd1 的如下:
1
2
3
4
5
6
❯ route -n
bd2 的如下:
1
2
3
4
5
6
7
8
9
10
11
12
13
14
15
16
17
18
19
20
21
❯ route -n
5.2.4 总结
这台访问 10.4.0.0/16(也就是 WireGuard 网段),都走 kilo0 网卡(就是 WireGuard 网卡);
云主机间通过 WireGuard VPN IP 互相访问;
ty1 上 pod 互访(就是访问 10.42.0.0/24 网段),走 kube-bridge 网桥,
ty1 访问其他 Node 的 Pod, 通过 kilo0:
访问 10.42.1.0/24(hw1 上的 pod),SNAT 走 hw1 的 WireGuard VPN IP:10.4.0.4
访问 10.42.2.0/24(tx1 上的 pod),SNAT 走 tx1 的 WireGuard VPN IP:10.4.0.5
访问 10.42.3.0/24(ali1 上的 pod),SNAT 走 ali1 的 WireGuard VPN IP:10.4.0.1
访问 10.42.4.0/24(bd1 上的 pod) 和 10.42.5.0/24(bd2 上的 pod),SNAT 都走 bd1 的 WireGuard VPN IP:10.4.0.2(因为 bd1 和 bd2 位于同一 VPC 内网,且只有 bd1 上有 WireGuard VPN IP,bd2 上没有)
ty1 通过云主机自带的内网 IP 访问其他 Node,也是通过 kilo0 SNAT 后走对应的 WireGuard VPN IP
bd1 访问 10.42.5.0/24(bd2 上的 pod), 通过 tunl0.
bd2 上,就只有 kube-bridge 和 tunl0
同一台机器 pod 互访,kube-bridge
访问其他机器 pod,走 tunl0 通过 VPC 内网 IP(192.168.64.4)到 bd,再由 bd1 转发出去。
🗒️ 再凝练下 :
同一 Node 里,走网桥;
同一 location,走自带的内网 IP(VPC 网络);
不同 location,走 WireGuard VPN;
kgctlKilo 提供了一个用于检查集群和与集群交互的命令行工具:kgctl。
这个工具可以用来理解一个网格的拓扑结构,获取对等点的 WireGuard 配置,或者绘制一个集群图。
kgctl 需要通过设置 KUBECONFIG 环境变量或提供 --kubeconfig 标志来提供 Kubernetes 配置文件。
安装
kgctl 二进制文件是为 Linux、macOS 和 Windows 自动编译的,每个版本的 Kilo 都可以从 GitHub 发布页面 下载。
命令
命令
语法
描述
graph kgctl graph [flags]以 GraphViz 格式生成表示集群拓扑的图形。
showconf kgctl showconf ( node | peer ) NAME [flags]显示网格中节点或对等体的 WireGuard 配置。
graph
⚠️ 注意 :
需要安装 circo,否则无法生成拓扑图。
安装命令:sudo apt install circos graphviz -y
graph 命令以 GraphViz 格式生成一个表示 Kilo 网格的图形。该图有助于理解或调试网络拓扑。
例子:
这将产生一些 DOT 图描述语言的输出,例如:
1
2
3
4
5
6
7
8
9
10
11
12
13
14
15
digraph kilo {
要渲染图形,使用 GraphViz layout 工具之一,例如 circo:
1 kgctl graph | circo -Tsvg > cluster.svg
showconf
showconf 命令输出集群中某个节点或对等体的 WireGuard 配置,即该节点或对等体为了参与 mesh 需要在其本地的 WireGuard 接口上设置的配置。例子:
1
2
NODE=master # the name of a node
这将产生一些 INI 格式的输出,例如。
1
2
3
4
5
6
7
8
[Interface] ListenPort = 51820 [Peer] AllowedIPs = 10.2 .0.0 /24 , 10.1 .13.74 /32 , 10.2 .4.0 /24 , 10.1 .20.76 /32 , 10.4 .0.2 /32 Endpoint = 3.120 .246.76 :51820 PersistentKeepalive = 0 PublicKey = IgDTEvasUvxisSAmfBKh8ngFmc2leZBvkRwYBhkybUg=
总结
WireGuard 配置
经过 Kilo 自动感知生成的 WireGuard 配置如下:
1
2
3
4
5
6
7
8
9
10
11
12
13
14
15
16
17
18
19
20
21
22
23
24
25
26
27
❯ kgctl showconf node ty1.k3s[Interface] ListenPort = 51820 [Peer] AllowedIPs = 10.42 .3.0 /24 , 172.21 .143.136 /32 , 10.4 .0.1 /32 Endpoint = [{{ ali1_public_ip }}]:51820 PersistentKeepalive = 20 PublicKey = tscPxxxxxxxxxxxxxxxxxxxxxxxxxxxxxxxxxxxxxxx=[Peer] AllowedIPs = 10.42 .4.0 /24 , 192.168 .64.4 /32 , 10.42 .5.0 /24 , 192.168 .64.5 /32 , 10.4 .0.2 /32 Endpoint = [{{ bd1_public_ip }}]:51820 PersistentKeepalive = 20 PublicKey = 29 khxxxxxxxxxxxxxxxxxxxxxxxxxxxxxxxxxxxxxrz8=[Peer] AllowedIPs = 10.42 .1.0 /24 , 192.168 .7.226 /32 , 10.4 .0.4 /32 Endpoint = [{{ hw1_public_ip }}]:51820 PersistentKeepalive = 20 PublicKey = B9JZe6X8+xxxxxxxxxxxxxxxxxxxxxxxxxxxxxxxxxxx=[Peer] AllowedIPs = 10.42 .2.0 /24 , 172.17 .0.3 /32 , 10.4 .0.5 /32 Endpoint = [{{ tx1_public_ip }}]:51820 PersistentKeepalive = 20 PublicKey = mn1rUiD+Zb3/xxxxxxxxxxxxxxxxxxxxxxxxxxxxxxxU=
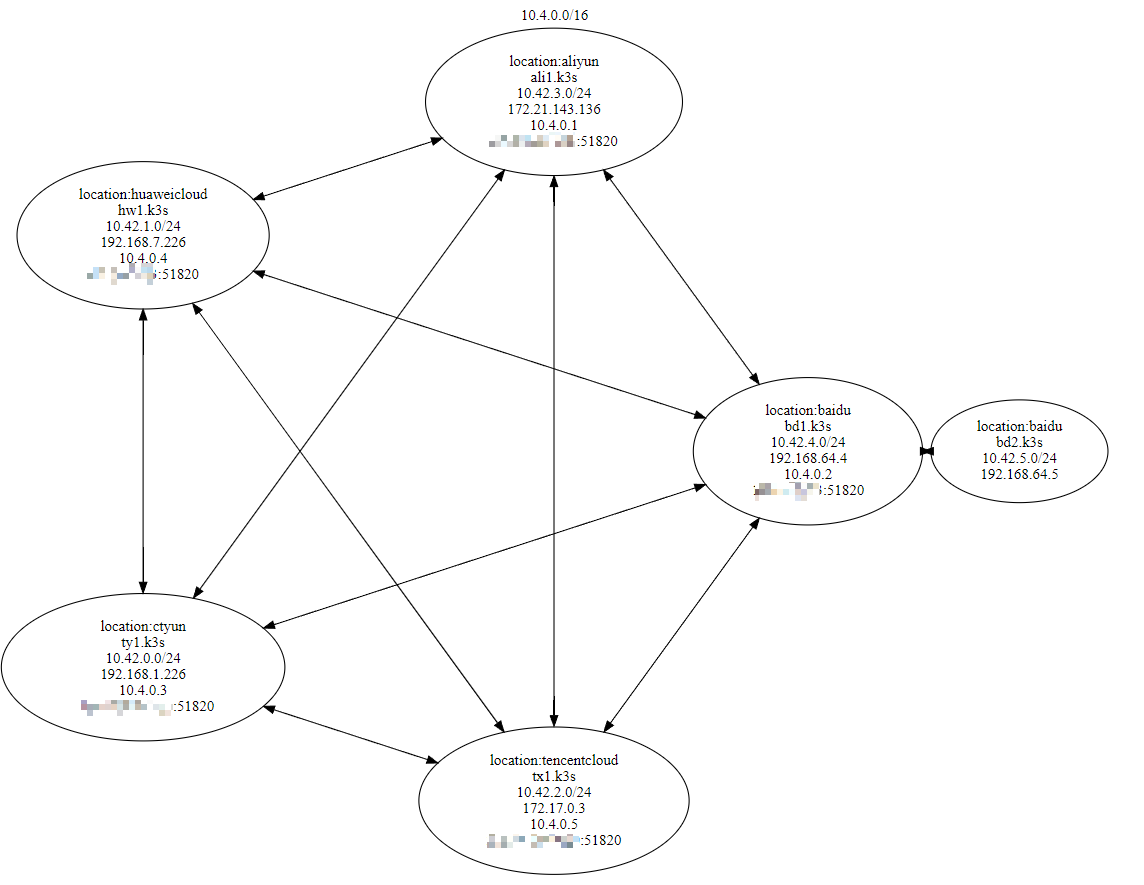
网络拓扑
如下图:
网络流
同一 Node 里,走网桥;
同一 location,走自带的内网 IP(VPC 网络);
不同 location,走 WireGuard VPN;
🎉🎉🎉